Django 所見即所得-富文本編輯器 CKEditor
首頁 >> 結帳英文 >>
================================
分享與讚美,是我們繼續打拼的原動力.
若文章對您有幫助,望請不吝按讚或分享.
或者對影片有興趣可以訂閱頻道接收通知
================================
YouTube 頻道
FB 粉絲專頁
================================
CKEditor 是一個開源所見即所得的文字編輯器,
可讓使用者查看編輯 HTML 檔案,
今天就來教大家如何使用:
Django 所見即所得-富文本編輯器 CKEditor
首先必須先安裝套件:
pip install django-ckeditor
並將其加入 settings.py,
INSTALLED_APPS = [
    .....省略.....,
    'ckeditor'
]
到 models.py 加入要使用 CKEditor 的欄位:
from django.contrib.auth.models import User
from django.db import models
from ckeditor.fields import RichTextField

class BlogPost(models.Model):
    title = models.CharField(max_length=50, default='')
    content = RichTextField(blank=True, max_length=300)
    author = models.ForeignKey(Profile, on_delete=models.CASCADE)
    classification = models.ManyToManyField(Classification)
將這些欄位加入 admin.py 中
from django.contrib import admin
from accounts.models import BlogPost, Profile


class BlogPostAdmin(admin.ModelAdmin):
    list_display = ('title', 'content', 'author')

admin.site.register(BlogPost, BlogPostAdmin)
接著同步資料庫:
pyhton manage.py makemigrations
pyhton manage.py migrate
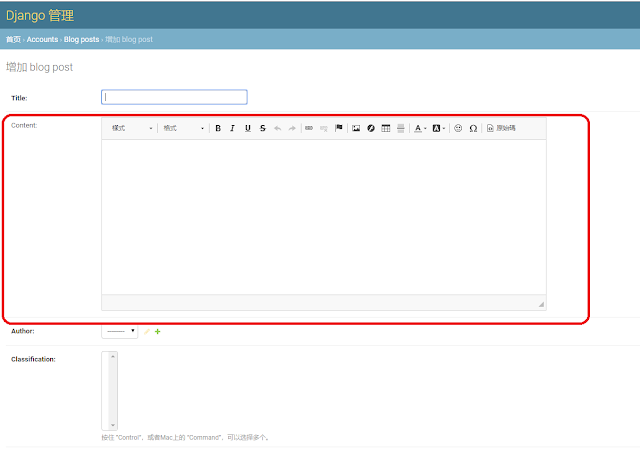
一個最基本的功能就都有了,
進入 Django admin 中就能看到富文本編輯器:

當然,
一篇好的文章勢必要圖文並茂,
所以可以讓使用者自行上傳圖片:
首先要安裝 pillow
pip install pillow
安裝完畢之後,
加入 ckedit_uploader,
INSTALLED_APPS = [

    'ckeditor',
    'ckeditor_uploader',
]
在 settings.py 加入設定:
MEDIA_URL = '/media/'
# 放在django 專案根目录,同时也需要新建media資料夾
MEDIA_ROOT = os.path.join(BASE_DIR, 'media')
CKEDITOR_UPLOAD_PATH = 'upload/'
而原本的 RichTextField 則要改為 RichTextUploadingField
from django.contrib.auth.models import User
from django.db import models
#from ckeditor.fields import RichTextField
from ckeditor_uploader.fields import RichTextUploadingField
class BlogPost(models.Model):
    title = models.CharField(max_length=50, default='')
    content = RichTextUploadingField(max_length=300)
    author = models.ForeignKey(Profile, on_delete=models.CASCADE)
    classification = models.ManyToManyField(Classification)
urls.py 則要新增:
from django.contrib import admin
from django.urls import path , re_path, include

urlpatterns = [
    path('admin/', admin.site.urls),
    path('ckeditor/', include('ckeditor_uploader.urls')),
]
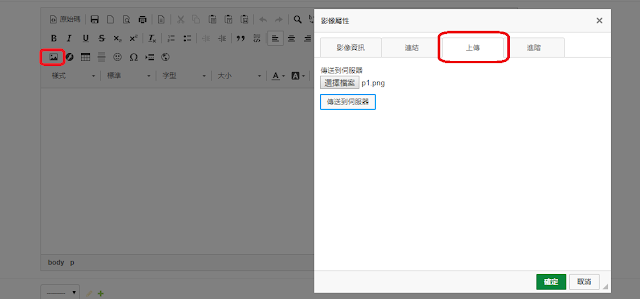
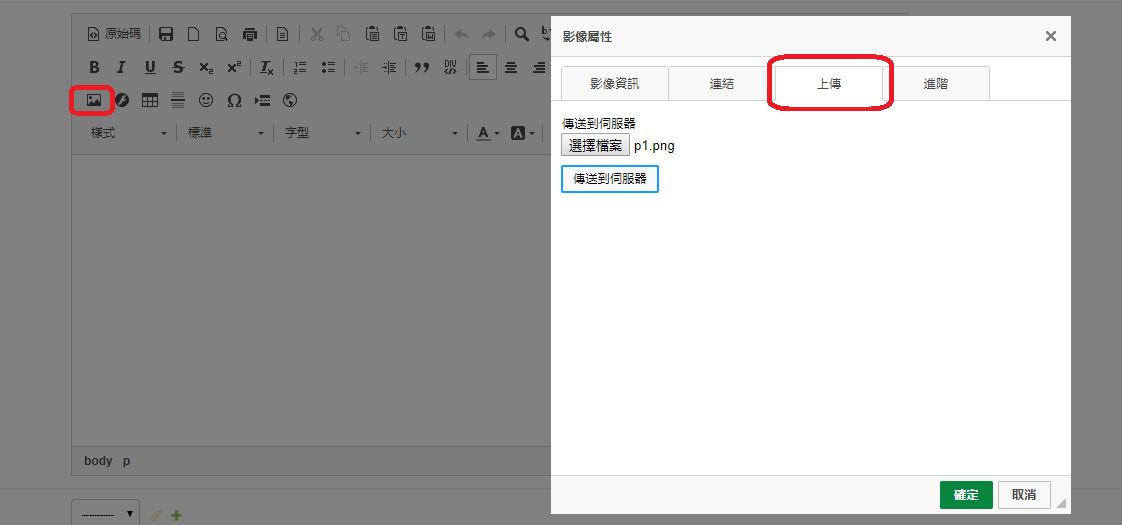
可看到上傳圖片多出了上傳選項:
在部署之後,
要記得開啟專案資料夾 media 與 media/upload 權限,
避免無法上傳。
除此以外,
可從 settings.py 自訂要顯示的功能:
CKEDITOR_CONFIGS = {
    'default': {
        'skin': 'moono-lisa',
    'toolbar_Basic': [
            ['Source', '-', 'Bold', 'Italic']
        ],
    'toolbar_Full': [
            [ 'Source','-','Save','NewPage','DocProps','Preview','Print','-','Templates' ],
            [ 'Cut','Copy','Paste','PasteText','PasteFromWord','-','Undo','Redo' ],
            [ 'Find','Replace','-','SelectAll','-','SpellChecker', 'Scayt' ],
            [ 'Form', 'Checkbox', 'Radio', 'TextField', 'Textarea', 'Select', 'Button', 'ImageButton', 'HiddenField' ],            '/',        [ 'Bold','Italic','Underline','Strike','Subscript','Superscript','-','RemoveFormat' ],
            [ 'NumberedList','BulletedList','-','Outdent','Indent','-','Blockquote','CreateDiv', '-','JustifyLeft','JustifyCenter','JustifyRight','JustifyBlock','-','BidiLtr','BidiRtl' ],
            [ 'Link','Unlink','Anchor' ],
            [ 'Image','Flash','Table','HorizontalRule','Smiley','SpecialChar','PageBreak','Iframe' ],            '/',
            [ 'Styles','Format','Font','FontSize' ] ,
            [ 'TextColor','BGColor' ] ,
            [ 'Maximize', 'ShowBlocks','-','About' ] ,
            ['CodeSnippet'],  #插入程式code按鈕

        ],
    'toolbar': 'Full',
    'extraPlugins': 'codesnippet',   #插入程式code    }
}
是否要顯示各項功能按鈕,
就能夠過此設定來做刪減,
這就是今天的主題:
Django 所見即所得-富文本編輯器 CKEditor
================================
分享與讚美,是我們繼續打拼的原動力.
若文章對您有幫助,望請不吝按讚或分享.
或者對影片有興趣可以訂閱頻道接收通知
================================
YouTube 頻道
FB 粉絲專頁
================================
![[Android]字串陣列與顏色的運用](https://blog.twshop.asia/wp-content/uploads/2021/11/str_1-1.jpg "[Android]字串陣列與顏色的運用")

